About This Blog...

I started this blog as a means of promoting my Etsy Shop. Most of the items here I have sold, or are for sale there. Take a peek. I think you'll like it.

Monday, December 10, 2012

Easy Piping...For a Pro Upholstered Look

My latested upcycle project is a trunk with an upholstered seat on top. I put a lot of work into it, but it still looked like a trunk with a pillow on it. It need a little something to make it look real. Piping was the detail that was missing, and I discovered that it was really easy to do.


 Staple the strip of fabric, wrong side up, to the underside of your seat. Half of the strip should hang over the edge.

Lay a piece of rope down the middle of the strip along the edge of the seat.


 Fold the strip over the rope and work it with your fingers until it rests at the very edge of the plywood bottom of your seat. Staple it as close to the edge as you can.


When you get to a corner, keep the rope folded tightly in the strip and fold it around the corner. Be sure that rope ends up right at the edge of the plywood again and staple it down. You can trim away excess fabric later.


When you get to the end, or if your strip is not long enough to go around your whole piece, just fold over the edge where it will overlap. Leave the rope about 3" inches longer on the end and cut it 3" shorter on the other end so that the fabric and rope don't end in exactly the same place.


Trim away any excess being careful not to cut into the fabric of your cushion. I made my beginning and ending point at the corners thinkng it would be less noticable, but I would not do this in the future as there is too much folded fabric on the corners already.


The finished trunk with upholstered top.

Sunday, December 2, 2012

A Duh! Moment...Templates

TEMPLATES...Why didn't I think of this sooner?...Duh!
Most of the stuff I upcycle is made from scavenged bits and pieces that were never really ment to go together. I got these great furniture feet of an old ottoman and wanted to put them on a trunk, but there  was no easy way for me to transfer location of the existing bolt holes of the legs to the bottom of the trunk.

After trying a few different methods I wondered how real furniture guys do this, and then it hit me. They have a factory, special tools, plans, and TEMPLATES!!!
I traced the top of the legs onto cardboard, poked a pencil through the bolt holes and used my template to locate the holes on the trunk!


Saturday, November 24, 2012

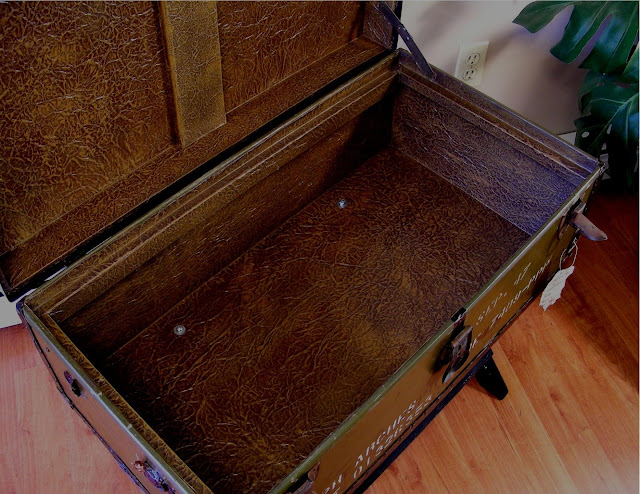
Faux Leather From Craft Paper

Trunk lined with faux leather.
Left: craft paper
.Middle: crumpled and uncrumpled.
Right: after ironing.
Tutorial for making paper that looks like leather.

1. Take plain brown craft paper and crumple it up, and gently, without ripping it, uncrumple it. Do this about 8 or 10 times.

2. Iron the paper flat. This will soften the look of the wrinkles.

3.  Using mod podge glue the paper to the surface that you want to leatherize (yeah, it's a real word). Work in manageable sections. Use enough mod podge to securely glue down the paper. Work it for a while to get all the air bubbles out!

4. Paint the entire paper with a very dark brown color. Mix a minuscule amount of another color to your very dark brown to slightly change its shade and apply it to your paper in places to add some variation. Let dry.

5. Put a bit of light brown paint on your brush, and brush it on a piece of scrap to get the bristles almost dry, and lightly brush the color over the entire piece. (this is called drybrushing). Paint on the light color with the long side of the bristles not the tips, almost like you're laying the brush flat. If done right the light brown should only come off on the wrinkles of the paper. Let dry.

Finished Army Trunk Table
6. Seal with clear finish. (I use polycrilic with satin finish, but mod podge would also work well)


Sunday, March 4, 2012

How Fat Is Your Hair?

So you made your cut and the piece is still just a hair too long. All you need is the tiniest trim off this piece and it will fit perfectly, but sometimes taking off just a little is difficult to set up.

To just shave the piece set it up against the blade (with the saw off!), then press a little harder against the blade until you see the blade bend just little, hold the piece tightly against the miter gauge and slide it back well clear of the blade. Turn the saw on, and make your cut. You will take off just a hair.

Sunday, February 26, 2012

The Dirtiest Trick I Know

I am not proud of this.
While driving one fine day I spied an awesome vintage dresser on the side of the road, FREE. It was in pretty good shape, sure some scratches and dings, a little peeling veneer, but totally workable. This baby was fresh from someone's basement, and had probably only seen sunlight for the past 30 minutes in the last 60 years. A super find.

One problem. No way was this thing going to fit in my car, and I had to be somewhere soon. No time to go home and get the van. If I left it there it would have been long gone by the time I got back. I looked around...No one watching...I grabbed a couple of the drawers and put them in the trunk, and got out of there.

 I was going crazy the rest of the day. Would the dresser still be there? Would the the kind homeowner who was giving away a dresser for free be watching, all the while cursing the lowlife that came and took just the drawers?

As soon as I got home I jumped in the van, returned to the scene of the crime, and there it was, the dresser, waiting for me. I loaded it in as casually as I could and got out of there, beaming with triumph all the way home.

Yeah, it's a dirty trick. Very few people want a dresser that's missing some drawers. It's like a big smile with a few missing teeth. If you do this don't be a jerk. Go back and get whatever it was you took a piece of.

Wrap It Up, I'll Take it!

In the middle of a painting project when the pizza guy shows up with your food? Wrap up your wet paint brush in a plastic shopping bag so that you can get a slice of pepperoni while it's still warm. This trick will work for overnight and can save you some clean up time, along as you'll be painting the same color tomorrow.
   And if your not going to use that color again till next weekend?...Wash your brush.

Upcycle An Old Door

Door panels can be assembled into many different things.
This is a door from my old house. Old doors are building blocks for upcyclers like you and me. If you have a table saw and maybe a friend who who can help you manage some awkward cutting, you can get a few nice panels that can be assembled into different things. Just make sure your door is solid wood (older ones usually are), and try to leave as much "frame" around your panel as you can. Most of them are put together with mortise and tenon joints which may loosen up or start to come apart. If so, some glue at small nails can get you right back.

Saturday, February 25, 2012

Suitcase Refurbishing: Just Look At That Shine

So you got a great deal on an old suitcase at that yard sale, but when you get it home and break out the cleaning products and scrub till your fingers fall off, it just doesn't get any cleaner. Depressing, isn't it. The old vinyl cases don't so much get dirty as dull.

This tutorial will get your suitcase shiny again. The real antique purists will probably howl with rage about this process, but like I said: It will work. This is an old vinyl (I think) suitcase that's pretty
dull.


I used some regular household cleaner on half of it. When it first goes on you think, oh man this thing's lookin' awesome. Then, when the cleaner dries it looks almost the same as before you started. It only looks good because the wetness of the cleaner made it shine. So you have to do something that makes it look wet all the time.


To accomplish this I just paint on a coat of clear sealer. I like the Painter's Touch finish in gloss. It gives you pretty good results and cleans with soap and water. Stir it when you first open the can. Never ever shake clear finishes to mix them. You'll get lots of air bubbles in it; tiny little buggers that you'll end up painting on to your piece that will look like grains of sand in the finish. Move quickly but surely as you want to keep a wet edge. Do not apply any more sealer to spots you've already done until the whole thing is completely dry. If you touch the stuff again as it's still setting up you will leave ugly streaks in it. Do not paint over the leather trim or any of the metal hardware. It just won't look good.


I applied the finish to half of this case so you can see the difference. And yes, the shiny side is dry in the photo.

To all you purists out there who think that I just ruined an antique by altering it I offer my sincerest apologies. But it don't look ruined to me.

At the time of this post this suitcase is available for purchase at my Etsy shop Destinations Vintage


Antiquing and Distressing: Coffee, it's not just for drinking

So you have a cool graphic or some text in nifty, old looking font; but the paper you print it on is just bright and white and new. Too bad you don't have any old looking parchment hanging around in your house. Do you drink instant coffee?..You do... Oh man, are you in luck. You can use that coffee to to make new paper look old.

Wet page with granules
Make a mixture of one tablespoon of instant coffee and a half cup of warm water. Print out your graphic or text on regular paper, and paint the mixture heavily on the back side of your graphic. Flip it over and do the same thing on the front. When paper gets wet the fibers absorb the liquid and stretch causing it to wrinkle. This may cause small puddles of coffee on the paper. Don't worry. This will just make it look better.  Take a few granules of instant coffee and sprinkle them over the wet page. They will dissolve slowly and make a nice dark stain where they lay.


Don't worry if it looks a little dark, it will lighten up as it dries.

Finished page 
A few words of caution to this tale:


Aging and distressing can be easily over done, as soon as you start to ask yourself  hey, is that enough granules on there or should I add more? the answer is, STOP.


If your graphic is not on the computer, but already printed on paper, you might want to test this on another piece of paper to get the hang of it before you do it on your one and only graphic.

Coffee staining is not colorfast. If your page stays dry, no problem. If it gets wet again the color will run. (It may make your piece look older and cooler)

Some other sites say you can stain the paper first and then run it through your printer. I've done it. It works. But do I really want to run a 2 cent piece of coffee stained paper through my $200+ printer?...NO.

Credit where it's due.
Half of the stuff I've learned about aging and distressing I've learned from propnomicon.blogspot.com. It's a site devoted to prop making for role playing games based on the works of H.P. Lovecraft. If you like Halloween, you'll like this site.


Friday, February 24, 2012

Decoupage.....for guys

When I hear the word decoupage it doesn't sound like something guys do. Well I'm changing that by upcycling and old ammo box with some vintage airplane spotter charts.

Stuff you need:

ammo can
graphics
Modpodge
paint brush

Trim your graphics to the size you want and lay them on the item you want to adhere them to. Test the fit until you get them where you want them. In pencil lightly mark the corners on your item.

Lightly sand the area where your graphics will go to remove any loose paint or rust and paint the area inside your pencil marks with the Modpodge. flip your graphics over and paint the back side with Modpodge going right to, or over the edge to be sure you get good coverage.  When you work with Modpodge you have to work quick as it dries fairly fast. Flip your graphic over and carefully lay it on your item. You will be able to slide it around a little bit for about a minute before it starts to set up.
   
Starting in the center gently work out any air bubbles by pushing them to the edges. Gently wipe any excess glue that bleeds out under the edges of your graphic. Don't be too worried if you're a little messy, Modpodge dries clear. On this piece I repeated the process for the graphic on the other side of the can with another graphic. If you are doing more than one graphic on an item, be careful to keep your work place clean. You don't want to put the good side of your graphic in any Modgepodge that might be on your table top.
The finished ammo box
You can paint Modpodge over the entire piece to seal protect it (remember it dries clear) but I chose not to.
I think it looks more authentic.

Man-cave ready.


At the time of this post, this item is available at my Etsy shop Destinations Vintage

Wednesday, February 22, 2012

Shameless Self Promotion

Wicked SpellsIsabella IceskaterSince decor is one of the topics covered in this blog, I hope you'll forgive a bit of shameless self promotion. On my wife's web site you can find some great holiday decor. We collaborate on the designs, so am I biased? Yes,  but, she is developing quite a following. Here's a few things.
Patrick O'RiellySnowshoe Sully

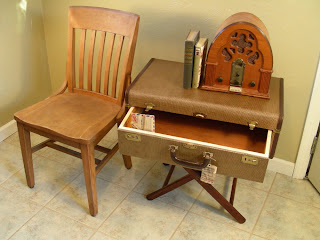
Suitcase Tables

You might as well know it now. Half of my projects are upcycled suitcases. Why? ...Darned if I know. I think there is just something cool about and old suitcase.


So my first post will be one of my favorites.  The suitcase table with drawer.
Yeah, It's under construction..............Disappointing isn't it?
check, one...two...is this thing on?